Table of Contents
Can I Put Shrinky Dinks In The Microwave
Shrinky dinks are a popular children’s craft that has been around since the 1970s. They are made from polystyrene plastic sheets that shrink to a smaller size when heated in an oven.
A common question is whether you can use a microwave to shrink shrinky dinks instead of a traditional oven.
What are Shrinky Dinks?
Shrinky dinks are thin plastic sheets that shrink down when baked in an oven. The sheets are made of polystyrene plastic. To use them, you draw or color designs on the sheets before baking. When heated, the plastic shrinks down usually to about 1/3 of its original size, making the designs thicker and smaller.
Shrinky dinks were invented in the 1970s and became a popular kids’ craft. They are a fun way for kids to make their own customized jewelry, ornaments, magnets, and more. The plastic comes in clear and colored sheets. Kids can use markers, colored pencils, paint pens, and acrylic paints to decorate them before shrinking.
Can You Microwave Shrinky Dinks?
Yes, you can use a microwave to shrink shrinky dinks. However, there are some important things to know about microwaving shrinky dinks to ensure success.
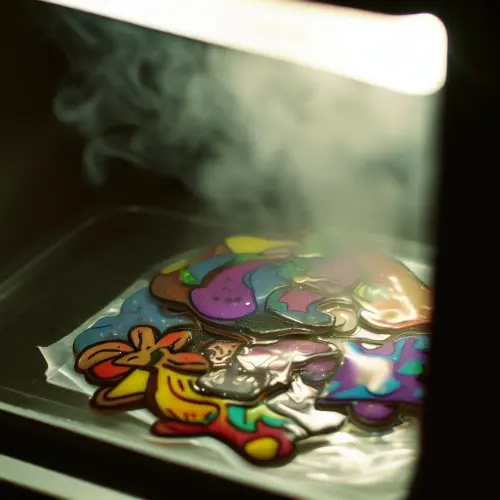
Microwaves heat unevenly, so the plastic may not shrink down evenly when microwaved. This can lead to warping or uneven shrinkage. Microwaves also heat very quickly, so there is a risk of overheating or burning the plastic if you microwave it for too long.
Tips for Microwaving Shrinky Dinks
If you want to use the microwave to shrink shrinky dinks, here are some tips:
- Use 30-second intervals to slowly heat the plastic. Check and rotate the plastic each time.
- Cover the plastic with microwave-safe parchment paper or wax paper while heating. This helps prevent uneven heating.
- Allow the plastic to rest between heating intervals. This lets the heat distribute through the plastic.
- Watch closely to prevent overheating.
- Use a lower power level on the microwave, around 50%.
- Expect more uneven shrinkage compared to using an oven. The plastic may bubble or warp.
- Avoid using an area larger than 3 x 3 inches. Smaller pieces work better.
- Let cool completely before handling so you don’t burn yourself.
Best Practices for Microwaving Shrinky Dinks
Follow these best practices when using the microwave for shrinky dinks:
- Place your decorated shrinky dink plastic on a microwave-safe plate or glass dish. Cover completely with parchment paper.
- Microwave at 50% power in 30-second intervals. Check and rotate the plastic each time.
- After 1-2 minutes, the plastic will start to curl and shrink. Continue microwaving for 10-30 seconds at a time until fully shrunk.
- Allow plastic to cool for 1-2 minutes between intervals. Let cool completely before handling.
- Expect uneven shrinkage and bubbling. Reheat areas that didn’t fully shrink as needed.
- Start with small pieces around 1-3 inches before trying larger pieces. They shrink more evenly.
Alternative Ways to Shrink Shrinky Dinks
While the microwave works for shrinky dinks, you’ll get the best results using an oven. Other options include:
- Conventional Oven: Bake at 325°F for 1 to 3 minutes following package instructions. This yields the most even shrinkage.
- Toaster Oven: Works the same as a regular oven. Follow the same baking instructions.
- Hair Dryer: Hold a hair dryer 3-4 inches over the plastic, moving continuously for even heating. Takes longer but works.
- Heat Gun: Use a low-temperature setting and hold 6+ inches away, moving continuously to evenly heat the plastic.
- Air Fryer: Set to 300°F and cook for 1-3 minutes, checking frequently. Parchment paper prevents sticking.
No matter the method, the key things are slow, even heating of the plastic and avoiding overheating. While the microwave provides a quick option for shrinky dinks, using an oven or air fryer will yield better results.
FAQs
Here are answers to some common questions about using the microwave to shrink shrinky dinks:
Can you put shrinky dinks directly in the microwave?
It’s best to cover them with parchment paper first. Direct contact with the microwave tray may lead to uneven heating.
How long does it take to microwave shrinky dinks?
Cook times will vary based on microwave wattage. Expect 1-3 minutes total cooking time, using 30-second intervals. Watch closely to avoid overheating.
Do you need to flip shrinky dinks while microwaving?
Yes, flip and rotate the plastic each time you heat it in 30-second intervals. This helps ensure even shrinkage.
Why do shrinky dinks bubble and warp in the microwave?
The uneven heating of the microwave can cause bubbling and warping. Reheating warped areas can help shrink them back down evenly.
Can you put colored shrinky dinks in the microwave?
Yes, but some colors may fade or run from the heat. Test a small colored piece first before microwaving colored pieces you’ve spent more time on.
Should shrinky dinks be completely cool before microwaving again?
It’s best to allow them to cool for 1-2 minutes between heating sessions. Letting them rest helps the heat distribute evenly through the plastic.
Tips for Making Shrinky Dinks
Beyond how you shrink them, here are some general tips for working with shrinky dinks:
- Use permanent markers or acrylic paint for best results when decorating. Avoid washable markers.
- If baking a batch, leave space between pieces so they don’t overlap when shrinking.
- Punch a hole before shrinking if you want to add a keychain loop or string.
- Sand any rough edges after shrinking using fine-grit sandpaper.
Conclusion
While the microwave can be used to shrink shrinky dinks, you’ll achieve the best results using an oven or toaster oven. The even, slower heating allows the plastic to shrink down smoothly and evenly on all sides.
But in a pinch, the microwave can work if you use lower power, cook in short intervals, and watch closely to prevent overheating.
No matter how you shrink them, shrinky dinks are a fun craft for kids of all ages to make personalized jewelry, magnets, ornaments, and more.

I’m Ian Welkins, a seasoned professional in the kitchen industry. My passion now drives me to provide invaluable insights into the world of top-notch kitchen products. With years of hands-on experience, I’m your go-to source for culinary excellence.